Ripping Open a JWT: What’s Inside Your Supabase Auth Token? (Part 2) | ReUneek
Ripping Open a JWT: What’s Inside Your Supabase Auth Token? (Part 2)
Bilal AhmedJul 20, 2026 • 6 min read
In Part 1 of our Supabase Auth series, we looked at the high-level architecture of how a user logs into a Next.js application. We learned that the moment your user types their credentials and hits submit, the Supabase GoTrue engine processes the request and drops a secret token into your browser's cookies.
That token is a JWT (pronounced "jot"), short for JSON Web Token.
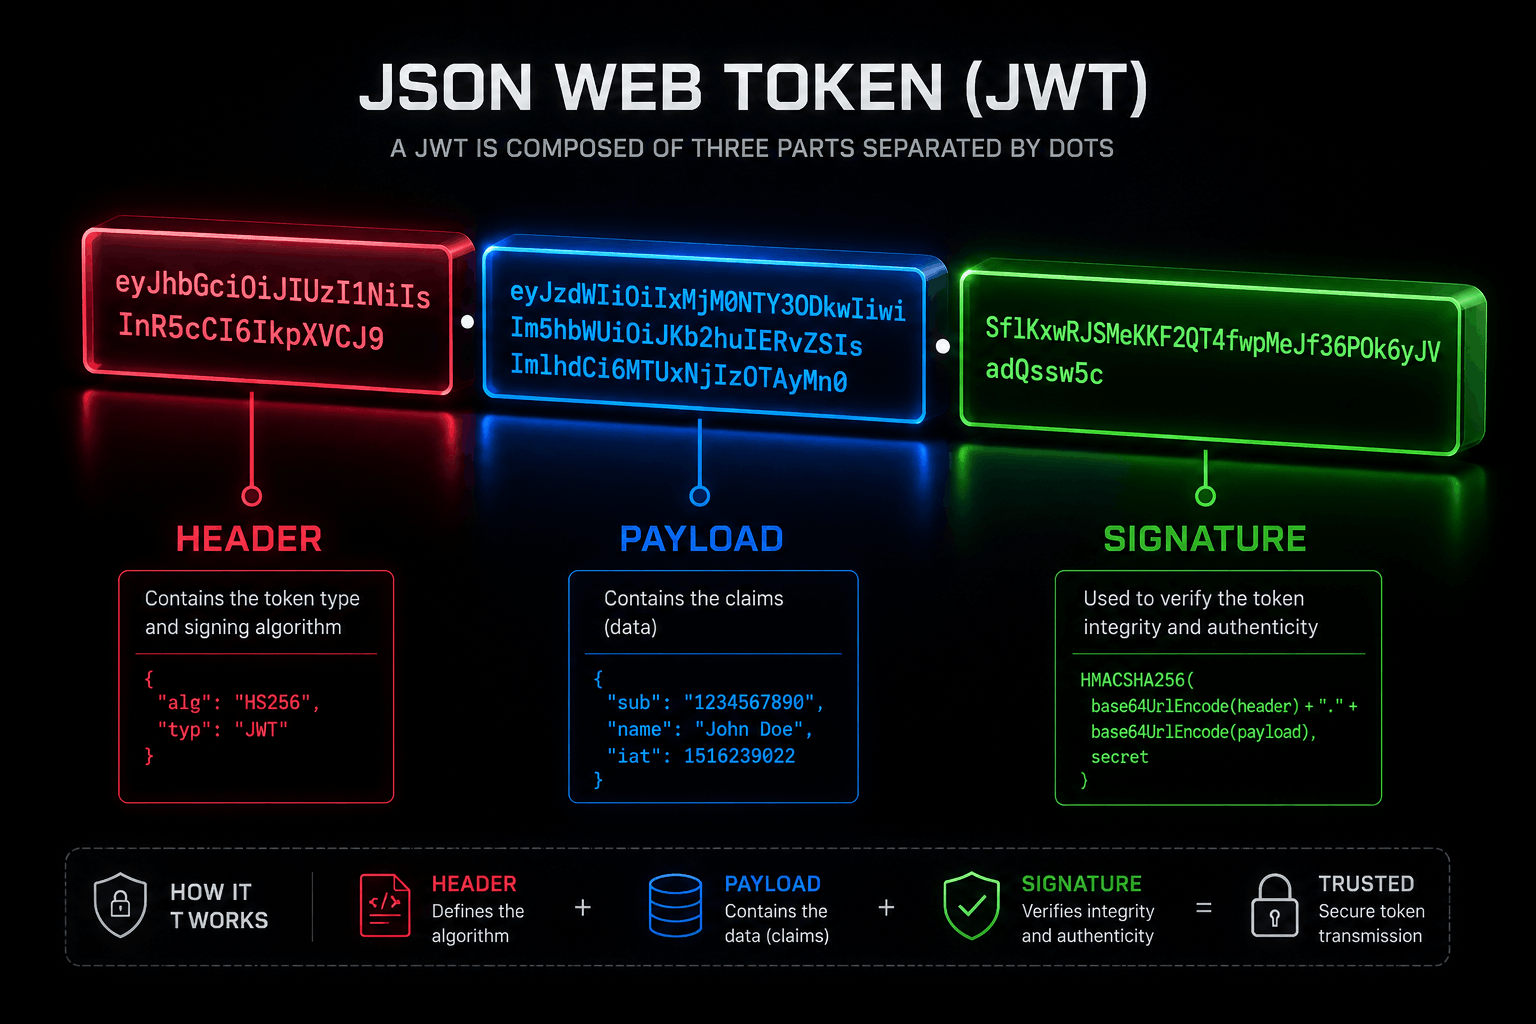
If you look at it in your browser's developer tools, it looks like an absolute mess, a giant, unreadable wall of random characters separated by two periods. It looks something like this:
As a full-stack developer, you cannot treat this string like a black box. This token is the passport for your user's data. Every time your Next.js frontend requests data from your PostgreSQL database, it flashes this passport.
Today, we are going to rip open a JWT. We will break down exactly what those three sections mean, what data Supabase packs inside them, and the crucial security rules you must follow so you don't accidentally leave your application wide open to hackers.
The Three Parts of a JWT
A JSON Web Token is not encrypted by default it is merely encoded. Specifically, it is encoded using Base64Url formatting. This means anyone can copy a JWT, drop it into a free tool like jwt.io, and read the exact text inside it in less than a second.
Every JWT is divided into three distinct parts, separated by periods (.): see the above image diagram.
1. The Header (The Metadata)
The very first section of the token tells the system how to read the rest of it. It typically contains two pieces of information: the type of token (which is always JWT) and the signing algorithm being used (usually HS256 or RS256).
When decoded, the header looks like a simple JSON object:
{"alg":"HS256","typ":"JWT"}
2. The Payload (The Claims)
This is the heart of the token. The payload contains the actual data about the user, known as claims. These are statements about the user's identity and permissions. Supabase populates this section with things like the user's unique UUID, their email address, their role, and any custom metadata you’ve attached to them (like a username or avatar URL).
3. The Signature (The Security Guard)
This is the most critical part of the token. The signature is created by taking the encoded header, the encoded payload, and running them through a hashing algorithm using a secret key that only your Supabase server knows.
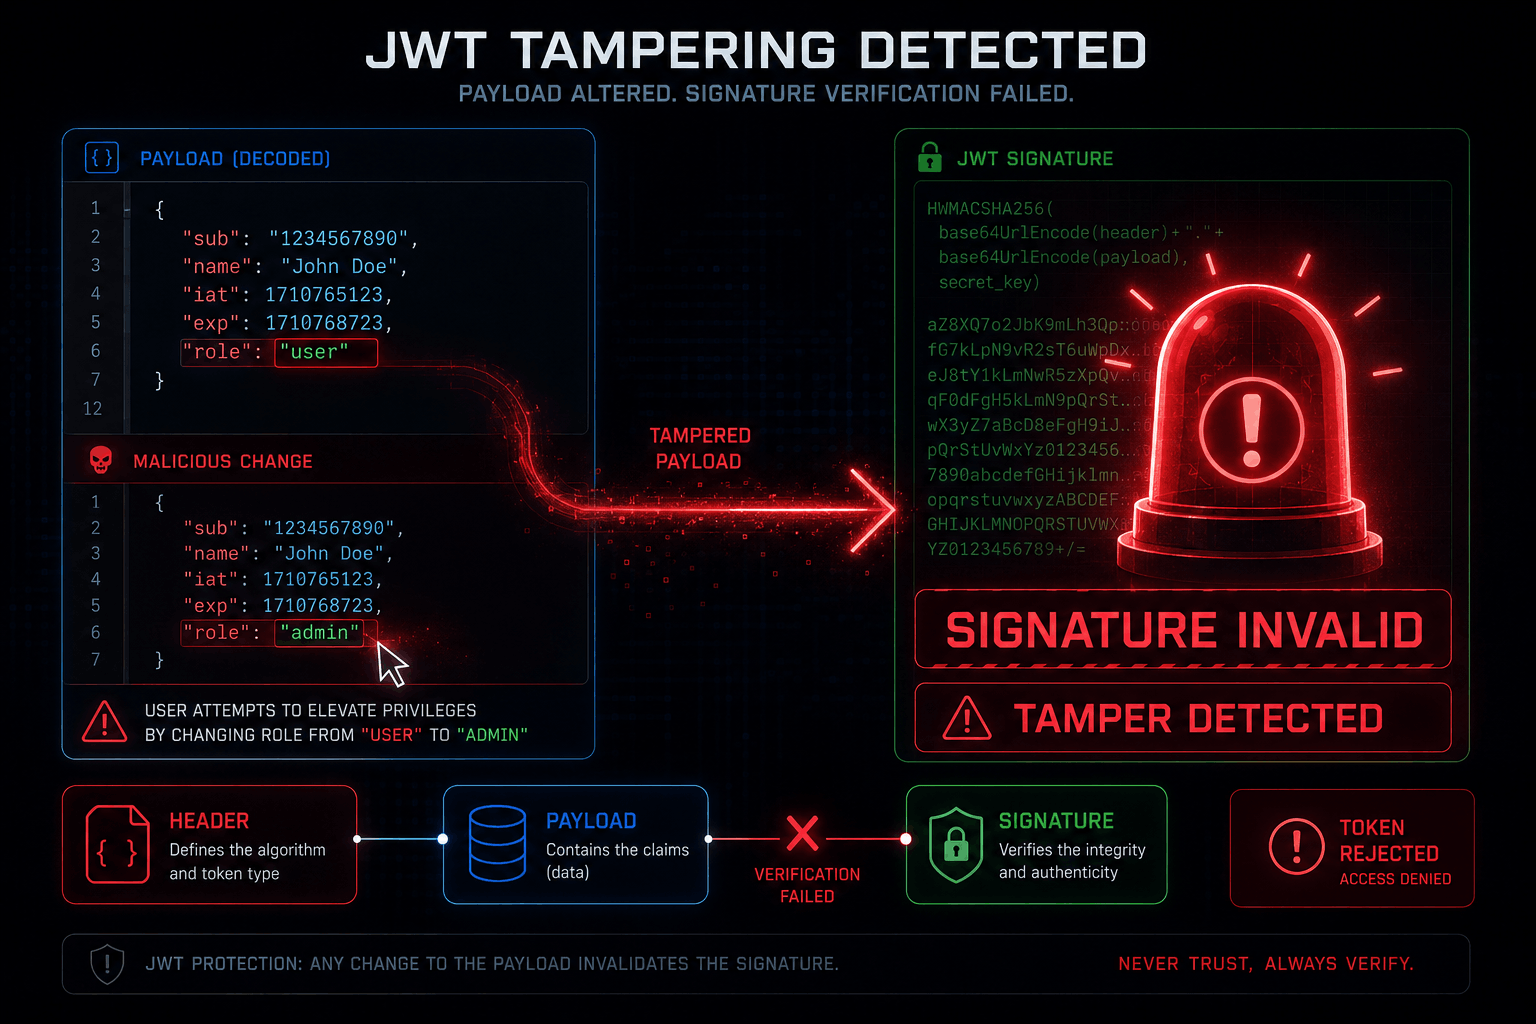
If a malicious user tries to alter the payload (for example, changing their user ID to match an admin's user ID), the signature will no longer match the payload data. The database will immediately notice the mismatch and reject the request.
When a user logs in via your Next.js app, Supabase structures the payload with very specific claims designed to work seamlessly with PostgreSQL. Let’s decode a typical Supabase token payload and look at what’s inside:
Let's translate these shorthand keys into plain English:
'aud' (Audience): This defines who the token is intended for. By default, Supabase sets this to authenticated. Your database checks this to ensure the token didn't come from an entirely different application.
'exp' (Expiration Time): A Unix timestamp stating exactly when this token dies. Supabase tokens are short-lived (usually expiring in 1 hour). This is a massive security feature: if someone steals a user's access token, it becomes completely useless after 60 minutes.
'sub' (Subject): This is the single most important string in the token. It is the user’s unique UUID pulled directly from the hidden auth.users table we talked about in Part 1. You will use this ID to map data to this specific user.
'role' : Defaults to authenticated. PostgreSQL reads this to know if the person making the database query is logged in or an anonymous guest.
How Next.js Reads the Token (Safely)
Because Supabase stores this JWT in browser cookies via the @supabase/ssr package, your Next.js app can read this token on both the client side and the server side.
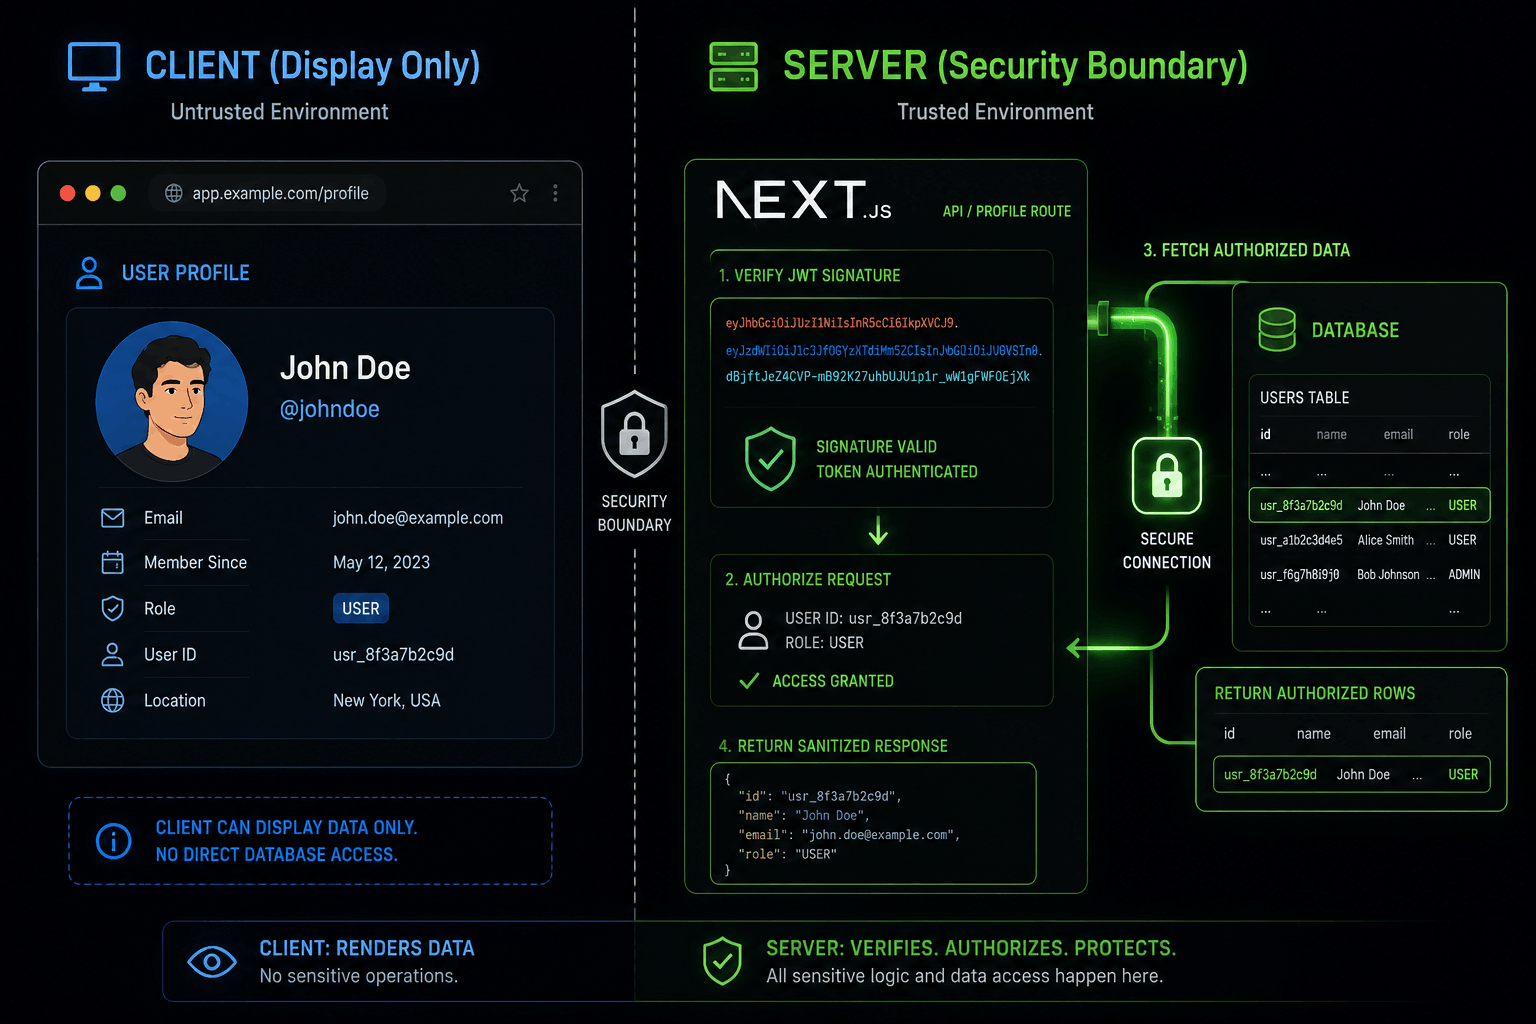
However, you must follow the golden rule of full-stack development: Never trust the frontend.
You can decode a JWT on the client side using JavaScript to show the user's username on a dashboard. But you should never use client-side decoding to authorize sensitive actions (like deleting an account or viewing an invoice).
Instead, you should leverage Next.js Server Components or Middleware to read and verify the token securely on the server side.
Here is how you safely fetch the current session and read the validated JWT claims inside a Next.js Server Component:
//typescript // app/dashboard/page.tsximport{ createClient }from'@/utils/supabase/server'import{ redirect }from'next/navigation'exportdefaultasyncfunctionDashboardPage(){// Initialize the server-side Supabase client (reads cookies automatically)const supabase =awaitcreateClient()// getUser reaches out to Supabase to securely validate the JWT signatureconst{data:{ user }, error }=await supabase.auth.getUser()if(error ||!user){// If the token is invalid, tampered with, or expired, kick them outredirect('/login')}return(<div className="p-8"><h1>Welcome back,{user.user_metadata.username}!</h1><p>Your secure UserIDis:{user.id}</p><p>Your authenticated email is:{user.email}</p></div>)}
Why use auth.getUser() instead of auth.getSession()?
auth.getSession() simply reads the data directly from the cookie payload without verifying it against the server. It is fast, but it can be spoofed on the client side. auth.getUser(), on the other hand, securely re-authenticates the JWT signature on every request, ensuring the data has absolutely not been altered.
The Secret Magic: Stateless Authentication
You might be wondering: If my Next.js frontend talks directly to my PostgreSQL database using this JWT, doesn't the database have to constantly ask the Supabase Auth server if the token is real?
No. And this is the beauty of JWTs.
JWT authentication is entirely stateless. Because your PostgreSQL database has a copy of your project's JWT Secret Key (found in your Supabase dashboard settings), it can verify the token entirely by itself using pure math.
When a request hits your database, the database takes the incoming Header and Payload, hashes them using its secret key, and compares its calculated hash to the Signature attached to the token. If they match, the database knows with absolute mathematical certainty that this token was issued by your Supabase project and hasn't been modified by a single byte.
This means your database doesn't need to perform any slow network requests or lookups to verify a session. It reads the token instantly, drastically speeding up your application's response times.
Hosting Performance Pro Tip: Because stateless authentication eliminates heavy database lookup overhead, your app stays incredibly fast even on entry-level hardware. If you are hosting your Next.js app on a budget-friendly platform like a Hostinger VPS, you can easily handle hundreds of concurrent users without running out of RAM or maxing out your CPU, because token verification requires virtually zero computing overhead.
Summary & What's Next
Let's wrap up what we learned today about the passport of your app:
JWTs are encoded, not encrypted. Anyone can read the payload data, so never put highly sensitive secrets (like API keys or credit card numbers) inside user metadata.
The Signature ensures absolute integrity. The database mathematically verifies that the payload hasn't been messed with.
Always verify on the server. Use server components or middleware running auth.getUser() to protect private routes.
Now your user is logged in, and your server safely understands exactly who they are based on their unique sub UUID inside the token payload.
But we still haven't solved the ultimate problem. If a logged-in user writes a raw SQL query or makes an API request to fetch a list of profile data, how do we stop them from seeing data that belongs to another user ID?
That brings us to the holy grail of Supabase development: Row Level Security (RLS). In Part 3, we are going to write PostgreSQL security policies that automatically read the incoming JWT claims and filter your database rows down to the exact item the user is legally allowed to see.
Get your Next.js project set up to handle server-side sessions, practice extracting user data from the token, and we will see you for the database security deep dive in next article.